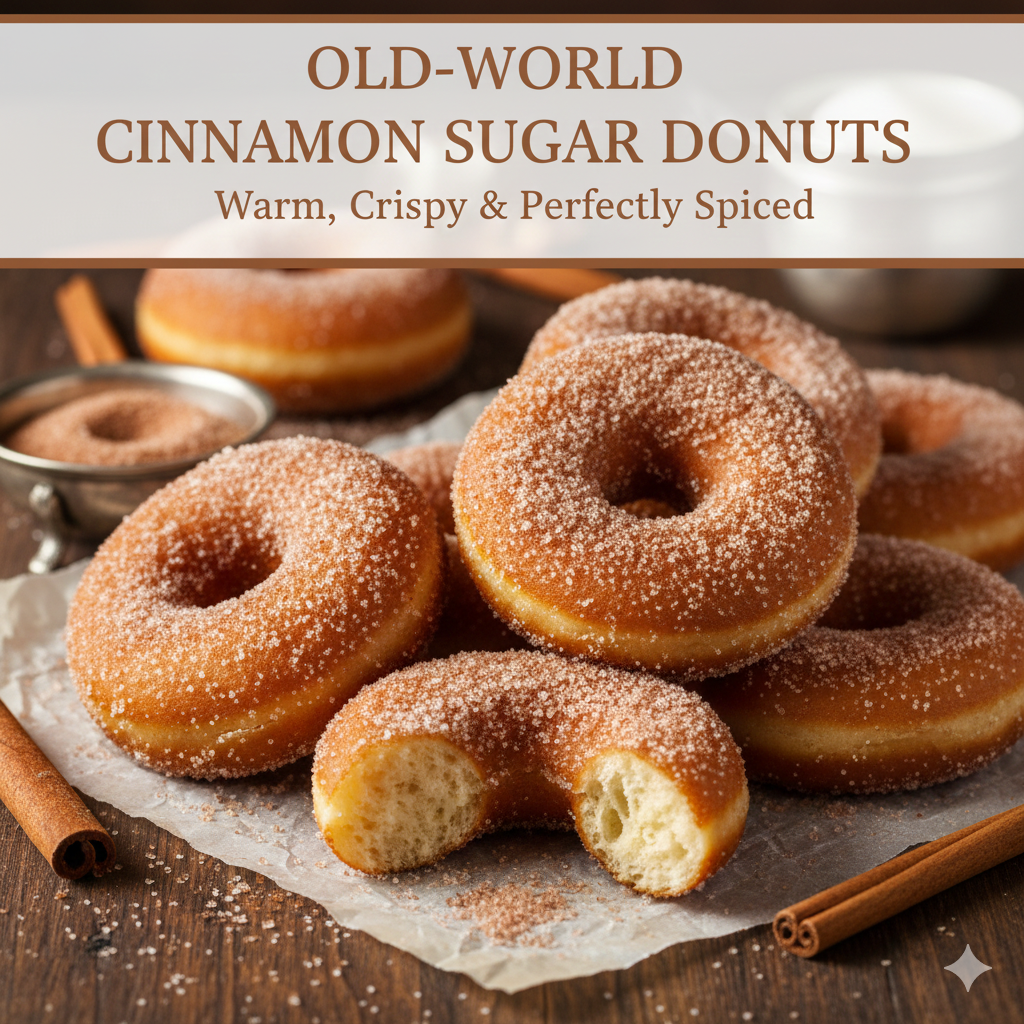
Old-World Cinnamon Sugar Donuts: Warm, Crispy & Perfectly Spiced
Few aromas transport you to another time quite like fresh donuts frying, their yeasty-sweet scent filling the kitchen with promises of crispy exteriors giving way to pillowy interiors. These old-world cinnamon sugar donuts resurrect that bakery magic, creating the kind of treat grandparents remember from childhood—simple, honest, impossibly delicious without relying on artificial flavors or fancy equipment. This is traditional baking at its finest, proving that spectacular results come from basic ingredients and patient technique.
What Separates These from Modern Versions
Contemporary donuts often disappoint with cake-like density, excessive sweetness, or chemical aftertastes from artificial additives. This vintage donut recipe takes a different path, using yeast-raised dough that ferments slowly, developing complex flavor and airy texture impossible to rush. The result tastes fundamentally different from quick cake donuts—lighter, more nuanced, with structure that stays tender for hours rather than turning stale within minutes.
The cinnamon sugar coating remains intentionally simple, letting the donut itself shine. No elaborate glazes, no trendy fillings, no Instagram-worthy decorations—just warm donuts rolled in fragrant cinnamon sugar that clings to their slightly oily surfaces. This restraint reveals confidence in the foundation rather than hiding mediocrity behind distractions.
Gathering Traditional Ingredients
Success starts with quality basics. You don’t need exotic items or specialty flours—just standard pantry staples treated with respect. Fresh yeast matters more than most ingredients since it provides the rise and flavor development. Active dry yeast works perfectly if that’s what you have, though instant yeast simplifies things by mixing directly into flour without proofing.
For the donut dough:
- Four cups all-purpose flour, plus more for dusting
- One packet (2¼ teaspoons) active dry yeast
- One cup whole milk, warmed to 110°F
- Quarter cup granulated sugar
- One teaspoon salt
- Two large eggs, room temperature
- Quarter cup unsalted butter, softened
- One teaspoon vanilla extract
- Half teaspoon ground nutmeg
For frying:
- Vegetable oil or shortening (enough to fill your pot three inches deep)
For coating:
- One cup granulated sugar
- Two tablespoons ground cinnamon
- Pinch of salt
The milk temperature matters crucially—too hot kills yeast, too cold prevents activation. Aim for pleasantly warm bath water temperature. If you’re unsure, err on the cooler side since yeast tolerates cold better than heat.
Mixing and Kneading the Dough
If using active dry yeast, proof it first by stirring it into the warm milk with a teaspoon of the sugar. Let this sit five minutes until foamy—if nothing happens, your yeast is dead and needs replacing. Instant yeast users can skip this step and add yeast directly to flour.
Whisk together flour, remaining sugar, salt, and nutmeg in the bowl of a stand mixer fitted with the dough hook, or in a large bowl if kneading by hand. Add the proofed yeast mixture (or milk and instant yeast), eggs, softened butter, and vanilla.
Mix on low speed until a shaggy dough forms, then increase to medium and knead for eight to ten minutes until the dough becomes smooth, elastic, and slightly tacky but not sticky. You should be able to stretch a piece thin enough to see light through it without it tearing—bakers call this the “windowpane test.”
Hand kneading requires more effort but works perfectly fine. Turn the dough onto a lightly floured surface and knead rhythmically, pushing away with the heel of your hand, folding back, rotating, and repeating. This takes about twelve to fifteen minutes of sustained work—consider it your kitchen workout.
The Critical First Rise
Place kneaded dough in a lightly oiled bowl, turning once to coat all surfaces. Cover with a damp towel or plastic wrap and set in a warm, draft-free spot. Let it rise until doubled in size, approximately one to one and a half hours.
Ideal rising temperature hovers around 75°F to 80°F. If your kitchen runs cold, try placing the bowl in an oven with just the light on, or near (not on) a warm stovetop. Too much heat rushes fermentation and creates off flavors, so resist cranking up temperatures artificially.
This first rise develops flavor as yeast consumes sugars and produces carbon dioxide plus alcohol and organic acids. Rushing it creates bland donuts, so be patient even when temptation whispers.
Shaping Your Donuts
Once doubled, punch down the dough to release excess gas. Turn it onto a lightly floured surface and roll to half-inch thickness—thicker than you might expect, but they’ll rise more during frying. Too thin creates crispy chips rather than fluffy donuts.
Cut rounds using a three-inch cutter, then cut centers with a one-inch cutter to create the classic ring shape. Save those centers—donut holes fry up beautifully and often disappear before the full-sized versions. Re-roll scraps gently once; beyond that, overworked dough becomes tough.
Place cut donuts on parchment-lined baking sheets dusted with flour, spacing them two inches apart. Cover loosely with clean towels and let rise again for thirty to forty-five minutes until puffy and nearly doubled. They should feel light and airy when gently touched, springing back slowly rather than deflating.
This second rise is crucial—underproofed donuts turn dense and doughy inside, while overproofed ones collapse during frying and absorb excessive oil. Look for that sweet spot where they’re billowy but still have structural integrity.
Mastering the Frying Process
Fill a heavy-bottomed pot or Dutch oven with three inches of oil and heat to exactly 375°F. Temperature precision matters enormously—too hot and exteriors burn before interiors cook, too cool and donuts absorb oil and turn greasy. A candy or deep-fry thermometer is essential unless your deep fryer has built-in controls.
Test oil temperature by dropping in a small piece of dough. It should sizzle immediately and bob to the surface, browning to golden in about sixty seconds. Once oil reaches proper temperature, carefully slide in two to three donuts using a slotted spatula. Don’t crowd them—they need space to float freely.
Fry for approximately sixty to ninety seconds per side until deep golden brown. They’ll puff dramatically as they hit the hot oil—this is perfect. Flip them once using chopsticks, a spider strainer, or slotted spoon. The second side typically cooks slightly faster than the first.
Remove finished donuts to a wire rack set over paper towels, letting excess oil drain for about thirty seconds. Don’t let them sit too long before coating—the residual warmth helps sugar adhere.
The Perfect Cinnamon Sugar Coating
Mix granulated sugar, cinnamon, and that pinch of salt in a shallow bowl or pie plate. The salt might seem odd but it enhances both sugar sweetness and cinnamon warmth, creating more complex flavor than either alone.
While donuts are still warm but not scorching hot, toss them in the cinnamon sugar mixture, coating all surfaces thoroughly. Use your hands to pat the coating gently, ensuring it sticks to every crevice. Work quickly since cooling donuts lose the slight tackiness that holds sugar.
Some bakers prefer rolling donuts in plain sugar first, then dusting with cinnamon. Others mix everything together. Both approaches work—choose based on whether you prefer uniform coating or more dramatic cinnamon streaks.
Serving Fresh for Maximum Impact
These homemade fried donuts taste best within two to three hours of frying when the contrast between crispy exterior and soft interior reaches its peak. Room temperature is fine—they don’t need reheating. Arrange them on a platter and watch them vanish as people claim “just one more” repeatedly.
Coffee provides classic accompaniment, its bitter edge balancing the sweet coating perfectly. Hot chocolate offers cozy alternative for children or chocolate lovers. Cold milk works beautifully too, particularly for dunking.
For breakfast service, pair with scrambled eggs and bacon for sweet-savory contrast. As dessert, vanilla ice cream or fresh whipped cream elevates them to special occasion status. Honestly though, they need no accompaniment beyond maybe a napkin for sugary fingers.
Storage and Reheating Reality
Despite best intentions, you might have leftovers. Store cooled donuts in an airtight container at room temperature for up to two days, though texture declines noticeably after day one. The coating may dissolve slightly into the donut, and the exterior loses its initial crispness.
Revive day-old donuts by warming in a 300°F oven for five minutes, then rolling in fresh cinnamon sugar. They won’t match just-fried glory but become respectable again. Microwaving works in emergencies though it creates chewy texture rather than crispy.
Freezing works better than most expect. Freeze uncoated donuts in a single layer until solid, then transfer to freezer bags. Thaw at room temperature, warm briefly in the oven, and coat with fresh cinnamon sugar. They’re surprisingly close to fresh.
Variations on the Classic
Once comfortable with this classic bakery donuts foundation, variations create interest while maintaining the essential character. Cardamom replaces or supplements cinnamon for Scandinavian flair. Vanilla sugar coating provides subtle elegance. Maple sugar creates fall-appropriate sweetness.
Fill cooled donuts with vanilla pastry cream, chocolate custard, or fruit preserves by piping through a small hole poked in the side. This transforms them from simple treats to bakery-level confections. Dust powdered sugar over filled versions for visual distinction.
Glaze instead of coating works beautifully—whisk together two cups powdered sugar, quarter cup milk, and vanilla until smooth, then dip warm donuts. The glaze sets into shiny coating that’s less messy than loose sugar.
Donut holes become vehicles for experimentation since their small size permits risk-taking. Try coating some in cocoa powder and sugar, others in orange zest and sugar, creating variety without committing entire batches.
Troubleshooting Common Problems
Dense, heavy donuts indicate insufficient rising, too much flour, or overworking the dough. Ensure both rises complete fully—patience rewards you here. Measure flour by spooning into cups rather than scooping, which compacts it. Knead just until smooth, not beyond.
Greasy donuts suggest oil temperature too low or insufficient draining after frying. Verify temperature with a thermometer rather than guessing. Let excess oil drip for at least thirty seconds on racks before coating.
Donuts that deflate when touched or during frying were overproofed during the second rise. Watch timing carefully and look for that puffy-but-stable stage. In warm kitchens, check progress every ten minutes rather than waiting the full suggested time.
Raw centers despite golden exteriors mean oil too hot. Lower temperature slightly and give each side more time. Cutting donuts too thick also causes this—aim for that half-inch thickness consistently.
The Heritage Behind This Recipe
These old-world baking recipes connect us to generations who viewed donut-making as normal home cooking rather than specialty bakery territory. Before chain shops standardized everything, families made donuts for special occasions or weekend treats, adapting recipes passed down through handwritten cards and oral tradition.
The yeast-raised technique particularly reflects European baking heritage where patience and skill mattered more than speed or convenience. While cake donuts emerged as American quick alternatives, yeast versions remained the gold standard for those who valued texture and flavor over expediency.
Making them yourself honors that tradition while creating something genuinely special. The effort—and it is effort compared to boxed mixes or drive-throughs—produces results incomparable to commercial versions. You taste the difference immediately.
Building Your Donut Confidence
Your first batch might not achieve perfection—perhaps the oil temperature fluctuated, or you underproofed slightly. These minor issues resolve quickly as you learn your kitchen’s peculiarities and develop feel for proper dough texture. The forgiving nature of yeast dough means even imperfect donuts taste wonderful.
Take notes about what worked and what you’d adjust. Did they need more rising time? Should the oil be slightly cooler? Would you prefer more cinnamon in the coating? These observations transform you from recipe-follower into confident baker who adapts based on results.
Your Path to Nostalgic Dessert Mastery
Start with this traditional cinnamon donuts recipe exactly as written to understand how components work together. Notice the dough’s transformation through rises. Observe the frying process carefully. Taste how the coating enhances rather than masks the donut itself.
Once you’ve succeeded with the original, explore variations mentioned or create your own while respecting fundamental technique. The template handles creativity within structure—proper rising and frying matter, but specific flavors and coatings offer flexibility.
Welcome to creating sugar coated donuts that resurrect old-world quality in modern kitchens, proving that spectacular treats don’t require professional equipment or secret techniques—just quality ingredients, careful attention, and respect for time-tested methods. Your homemade doughnuts journey begins now, with the promise that once you taste these, store-bought versions will never satisfy quite the same way again.