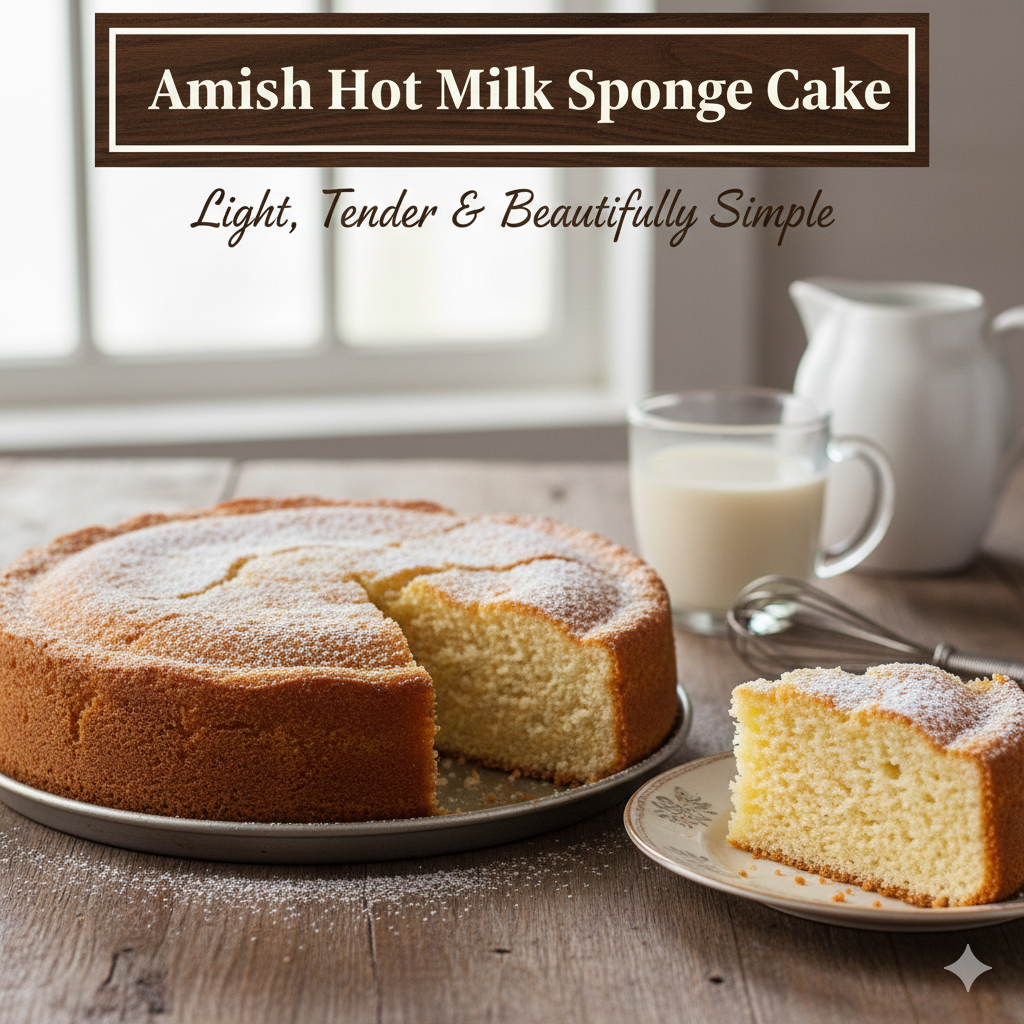
Amish Hot Milk Sponge Cake: Light, Tender & Beautifully Simple
Few cakes capture old-fashioned simplicity and surprising elegance quite like an Amish hot milk sponge cake emerging from the oven with its golden top and impossibly tender crumb. This traditional recipe relies on pantry staples every household owns—eggs, sugar, flour, milk, and butter—yet transforms them through a unique hot milk technique into something remarkably light and delicate. It’s the kind of honest, unfussy dessert that Amish bakers perfected through generations, proving that spectacular results don’t require complicated ingredients or fancy techniques.
Understanding What Makes This Cake Special
Unlike typical butter cakes creamed for volume or foam cakes whipped to airy peaks, hot milk sponge cake occupies a unique middle ground. The heated milk and melted butter get folded into whipped eggs at the end rather than creamed at the beginning, creating texture that’s lighter than pound cake yet sturdier than angel food. The result feels almost impossibly tender—each slice practically melts on your tongue while maintaining enough structure to support frosting or simply stand alone.
The hot milk itself serves multiple purposes. It helps dissolve sugar completely, creates steam during baking that contributes to rise, and incorporates fat smoothly throughout the batter without the extended beating traditional butter cakes require. This Amish baking wisdom produces consistently excellent results with minimal risk of the common problems that plague other cake types.
Gathering Your Simple Ingredients
The ingredient list reflects Amish values of simplicity and accessibility—nothing exotic, nothing expensive, just quality basics treated with respect and proper technique.
Complete ingredient list:
For the cake:
- Four large eggs, room temperature
- Two cups granulated sugar
- Two cups all-purpose flour
- Two teaspoons baking powder
- One teaspoon salt
- One cup whole milk
- Two tablespoons unsalted butter
- One teaspoon vanilla extract
Optional simple frosting:
- Two cups powdered sugar
- Three tablespoons butter, softened
- Two to three tablespoons milk
- Half teaspoon vanilla extract
The room temperature eggs matter enormously—cold eggs don’t whip to the same volume as warm ones. Set them on the counter at least one hour before baking, or place whole eggs in a bowl of warm water for ten minutes to bring them to proper temperature quickly.
Preparing Your Pan and Oven
Position an oven rack in the center and preheat to 350°F—sponge cakes need moderate, even heat. Grease a 9×13-inch baking pan thoroughly, then dust with flour, tapping out excess. This double insurance prevents sticking that would ruin the cake’s delicate texture. Alternatively, line the bottom with parchment paper for absolutely foolproof release.
Some bakers prefer using two nine-inch round pans for layer cake presentation. The baking time reduces to twenty-five to thirty minutes for round pans versus the thirty-five to forty minutes needed for the rectangular pan.
Whipping Eggs to Proper Volume
Place eggs in the bowl of a stand mixer or a large mixing bowl if using a hand mixer. Beat on high speed for one full minute until eggs become frothy and pale yellow. This initial beating aerates the eggs, preparing them to accept sugar.
With the mixer still running on high, gradually add sugar in a slow, steady stream over the course of about one minute. Don’t dump it all at once—gradual addition allows sugar to dissolve properly while incorporating into the eggs smoothly.
Continue beating on high speed for a full five minutes after all sugar is added. Set a timer because this seems interminable when you’re standing there watching, but it’s absolutely essential. The mixture should become very thick, pale, and fluffy—almost tripling in volume. When you lift the beater, the mixture should fall in thick ribbons that hold their shape briefly on the surface before sinking back in.
This extended beating incorporates the air that provides much of the cake’s rise and creates the foundation for its tender texture. Shortchanging this step produces dense, heavy cake rather than the light, delicate crumb you’re after.
Incorporating Dry Ingredients
While eggs beat, whisk together flour, baking powder, and salt in a medium bowl. This ensures even distribution of leavening throughout the flour, preventing pockets of bitter baking powder in the finished cake.
Once eggs reach proper volume, reduce mixer speed to low. Add dry ingredients in three additions, mixing just until flour disappears after each addition. Don’t overmix once flour is added—excessive beating develops gluten that creates tough, chewy texture rather than tender crumb. A few small floury streaks remaining when you stop mixing are perfectly fine.
The Critical Hot Milk Addition
Heat milk and butter together in a small saucepan or microwave-safe bowl until butter melts completely and mixture steams—approximately 180°F if you’re checking with a thermometer. The milk doesn’t need to boil, just get very hot. Stir in vanilla extract.
Here’s where technique becomes crucial. With mixer on low speed (or by hand using a large spoon), pour the hot milk mixture in a steady stream into the batter, mixing just until combined. The hot liquid will deflate the batter somewhat—this is normal and expected. Work quickly but gently, folding just until you see no streaks of milk remaining.
This hot milk incorporation distinguishes this cake from all others. The heat helps the batter come together smoothly while the steam generated during baking contributes to rise and moisture. Don’t panic when the fluffy batter deflates—it rises beautifully in the oven.
Baking to Golden Perfection
Pour batter immediately into your prepared pan and spread evenly with a spatula. Tap the pan firmly on the counter two or three times to release any large air bubbles trapped in the batter.
Bake for thirty-five to forty minutes (twenty-five to thirty for round pans) until the top is golden brown, the cake springs back when lightly pressed, and a toothpick inserted in the center emerges clean or with just a few moist crumbs. The edges will pull away slightly from the pan sides.
Don’t overbake—this delicate cake dries out quickly when left in the oven too long. Start checking at the minimum time and pull it promptly when done. The internal temperature should read between 200°F and 205°F.
Remove from the oven and let cool in the pan on a wire rack for ten minutes. Run a knife around the edges to loosen, then invert onto the rack to cool completely. The cake should release easily if you greased and floured properly. Peel off parchment if you used it.
Serving Simply or Dressed Up
This versatile cake shines in multiple presentations. Serve plain, lightly dusted with powdered sugar for understated elegance. The cake’s tender crumb and subtle sweetness need no embellishment to satisfy completely.
For slightly sweeter presentations, spread with the simple buttercream frosting: beat softened butter with powdered sugar, adding milk gradually until you achieve spreadable consistency, then mix in vanilla. This quick frosting takes maybe five minutes and complements without overwhelming.
Fresh berries and whipped cream transform the cake into strawberry shortcake. The sturdy-yet-tender texture soaks up berry juices beautifully while maintaining its structure. Layer sliced cake with sweetened whipped cream and macerated strawberries for classic summer dessert.
Toasted coconut sprinkled over frosted cake adds textural interest and tropical notes. Lemon curd spread between layers creates bright, tangy contrast to the sweet cake. The possibilities multiply endlessly while the base cake remains constant.
Storage and Freshness
Store unfrosted cake wrapped tightly at room temperature for up to three days. The cake actually improves slightly on day two as flavors meld and moisture distributes evenly. Frosted cake should be covered and can stay at room temperature for two days or refrigerated for up to five days.
Freeze unfrosted cake layers wrapped tightly in plastic wrap then aluminum foil for up to three months. Thaw at room temperature while still wrapped so condensation forms on wrapping rather than the cake surface. The texture survives freezing remarkably well, making this excellent for advance preparation before celebrations.
Individual slices freeze beautifully too—wrap each piece separately for grab-and-go treats pulled from the freezer as needed.
Why This Traditional Recipe Endures
Beyond delicious flavor and tender texture, this cake represents values of simplicity and resourcefulness that define Amish culture. It uses ingredients available in any rural pantry, requires no special equipment beyond basic mixing tools, and produces impressive results through technique rather than expensive components.
The recipe’s reliability appeals across skill levels. Beginners succeed because the method forgives minor mistakes, while experienced bakers appreciate the consistent, dependable results. This accessibility explains its endurance through generations—it simply works, every time, for everyone.
Troubleshooting Common Issues
Dense, heavy texture indicates insufficient egg beating or overmixing after adding flour. Beat eggs for the full five minutes after adding sugar—this isn’t negotiable. Mix flour additions just until incorporated, then stop immediately.
Sunken center suggests removing the cake from the oven too early or opening the oven door during the first twenty minutes of baking. Don’t peek until at least twenty-five minutes have passed, and ensure the center springs back when pressed before removing from the oven.
Dry crumb means overbaking or measuring flour incorrectly. Spoon flour into measuring cups and level rather than scooping, which compacts flour and adds too much. Check for doneness at the minimum baking time and remove promptly when tests indicate it’s ready.
Tough, chewy texture results from overmixing after adding flour or using bread flour instead of all-purpose. Mix gently and briefly once flour is added, and verify you’re using the correct flour type.
Your Path to Sponge Cake Success
Start with this recipe exactly as written to understand how the unique method works. Notice the batter’s transformation during egg beating. Observe how hot milk incorporates. Experience the tender, delicate result that proper technique creates.
After mastering the original, explore variations that suit your preferences. Perhaps you’d enjoy adding citrus zest, almond extract, or spices. Maybe you prefer different frostings or serving styles. These adaptations personalize the recipe while respecting its essential character.
Welcome to baking that connects you to generations of simple, honest dessert-making—where basic ingredients and patient technique create something genuinely special, and where the best recipes aren’t always the most complicated, just the ones executed with care and respect. Your golden, tender triumph awaits in the oven.