Best Thanksgiving Turkey Brine (Wet & Dry Guide): Juicy, Flavorful & Foolproof
The difference between a turkey that earns genuine compliments and one people politely tolerate often comes down to a single step: brining. Learning the best Thanksgiving turkey brine techniques—both wet and dry methods—transforms your holiday centerpiece from potentially dry, bland meat into something genuinely delicious that justifies the fuss and expense. This isn’t complicated culinary science requiring chemistry degrees, just understanding how salt and time work together to create the juicy, flavorful results everyone craves but few achieve.
Understanding How Brining Actually Works
Brining isn’t magic, though results can seem magical. Salt disrupts protein structures in muscle tissue, allowing them to retain more moisture during cooking. It also seasons the meat throughout rather than just on the surface, creating flavor that penetrates deep into the breast and thighs. Whether you use wet brine (salt dissolved in liquid) or dry brine (salt rubbed directly on the turkey), the fundamental chemistry remains identical—only the method differs.
The science gets more interesting when you understand that brined turkey actually absorbs salt and water into its cells. During cooking, even when internal temperatures rise well above levels that would normally squeeze out moisture, the altered protein structure holds onto more liquid. This means you can cook turkey to safe temperatures without the dryness that plagues unbrined birds. That extra moisture retention translates directly to juicier meat and more forgiving cooking.
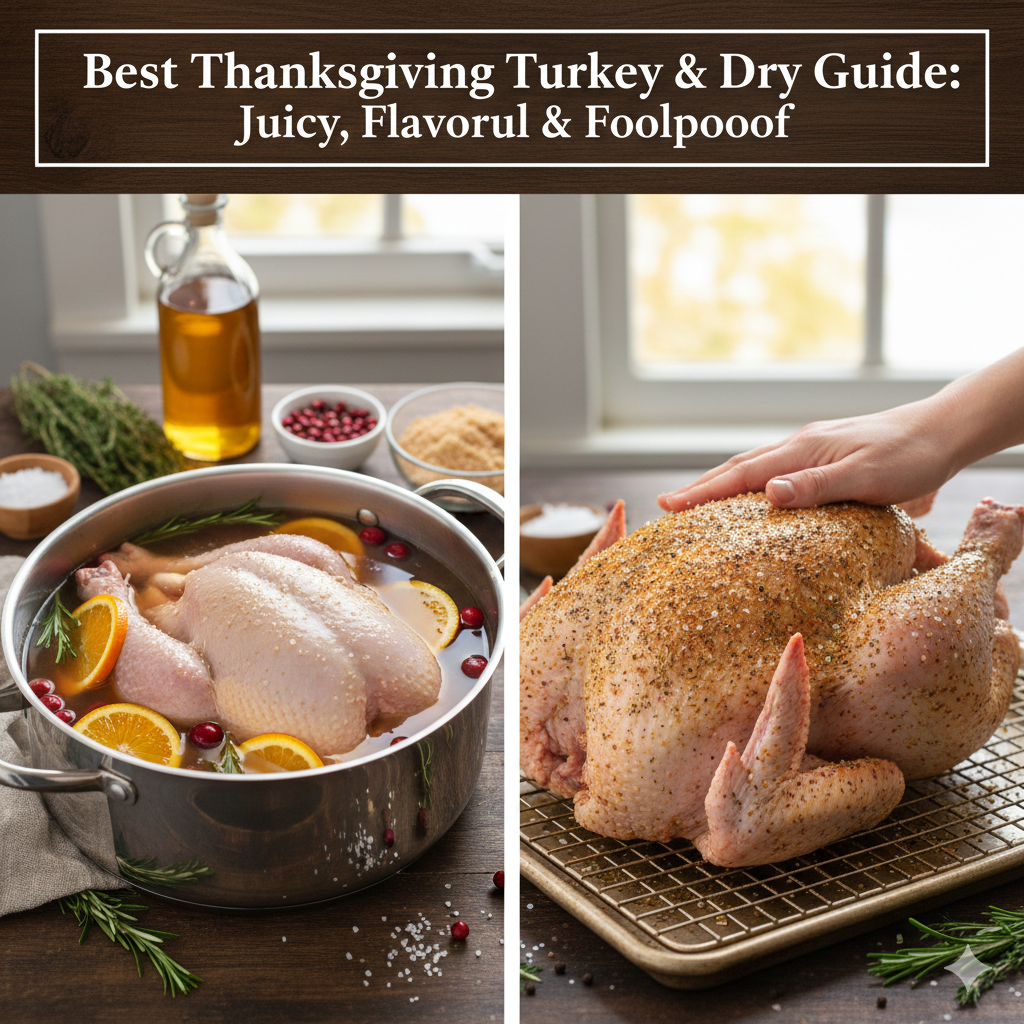
Wet Brine: The Traditional Approach
Wet brining involves submerging your turkey in salted water solution, typically for twelve to twenty-four hours. The liquid medium allows salt to penetrate quickly while adding aromatics creates subtle flavor complexity throughout the meat.
Classic wet brine formula for 12-14 pound turkey:
- Two gallons cold water
- One cup kosher salt
- Half cup brown sugar
- One tablespoon black peppercorns
- Two bay leaves
- One tablespoon dried thyme
- One tablespoon dried sage
- One orange, quartered
- One onion, quartered
- Six garlic cloves, smashed
- Optional: one cup apple cider or white wine
Combine all ingredients in a stockpot large enough to hold the turkey, stirring until salt and sugar dissolve completely. If you want to accelerate this, heat half the water with salt and sugar until dissolved, then add remaining cold water and aromatics. The brine must be completely cold before adding turkey—warm brine promotes bacterial growth.
Remove turkey from packaging, remove giblets and neck from cavity, and submerge completely in brine. Weight with a plate if necessary to keep it under the surface. Refrigerate for twelve to twenty-four hours—longer isn’t better and can make meat overly salty or mushy.
After brining, rinse the turkey thoroughly under cold running water to remove excess salt, then pat completely dry with paper towels. Let it air-dry uncovered in the refrigerator for at least four hours, ideally overnight. This final drying step is crucial for crispy skin.
Dry Brine: The Modern Alternative
Dry brining requires no special equipment, no massive containers, and no refrigerator Tetris trying to fit a bucket. You simply rub salt directly on the turkey and let time work its magic. Many professional chefs and serious home cooks actually prefer this method because it concentrates rather than dilutes flavor while guaranteeing crispy skin.
Simple dry brine for 12-14 pound turkey:
- One-third cup kosher salt
- Two tablespoons brown sugar
- One tablespoon black pepper
- Two teaspoons dried thyme
- Two teaspoons dried sage
- One teaspoon garlic powder
- One teaspoon onion powder
Mix all ingredients thoroughly in a small bowl. Remove turkey from packaging, remove giblets and neck, and pat the bird completely dry inside and out with paper towels. Moisture is the enemy of both salt absorption and crispy skin, so take time to dry thoroughly.
Sprinkle the salt mixture all over the turkey—under the skin on the breast and thighs wherever you can reach, inside the cavity, and all over the outside. Use your hands to distribute evenly and massage gently into the skin. Don’t skimp—you want thorough coverage though not so heavy it forms a solid crust.
Place the seasoned turkey on a wire rack set over a rimmed baking sheet, breast-side up. Refrigerate uncovered for at least twelve hours, ideally two to three days. The uncovered refrigeration serves double duty: the salt penetrates deeply while the skin dries thoroughly, guaranteeing that crispy texture everyone loves.
Comparing Wet vs. Dry Brining
Wet brine advantages:
- Faster penetration (works in as little as twelve hours)
- Adds more moisture to the meat
- Aromatics infuse throughout
- Traditional method with proven track record
Wet brine disadvantages:
- Requires large container and refrigerator space
- Can dilute turkey’s natural flavor
- Must rinse and dry afterward
- Skin tends to be less crispy unless meticulously dried
Dry brine advantages:
- No equipment needed beyond a rack and pan
- Superior crispy skin
- Concentrates rather than dilutes flavor
- Easier logistics and less mess
Dry brine disadvantages:
- Requires longer time (ideally 2-3 days)
- Doesn’t add moisture, only helps retain it
- Less aromatics penetration
- Takes up refrigerator space uncovered
Neither method is objectively superior—choose based on your priorities, timeline, and refrigerator capacity. Both produce dramatically better results than no brining at all.
Timing and Turkey Size Adjustments
The formulas above work for twelve to fourteen-pound turkeys—the size most households serve. Adjust proportions for different sizes:
For 8-12 pounds:
- Wet brine: one and a half gallons water, three-quarters cup salt
- Dry brine: quarter cup salt mixture
- Time: minimum twelve hours for either method
For 15-18 pounds:
- Wet brine: two and a half gallons water, one and one-quarter cups salt
- Dry brine: half cup salt mixture
- Time: eighteen to twenty-four hours wet, two to three days dry
For 19-24 pounds:
- Wet brine: three gallons water, one and a half cups salt
- Dry brine: two-thirds cup salt mixture
- Time: twenty-four hours wet, three days dry
Never brine longer than twenty-four hours for wet method or four days for dry—excessive time creates unpleasant texture and overly salty meat.
Aromatics and Flavor Variations
Once you understand the basic technique, creative seasoning variations personalize your results. These additions enhance but shouldn’t overwhelm the turkey’s natural flavor.
Herb-forward brine: Double the sage and thyme, add fresh rosemary sprigs and parsley. Include lemon slices instead of orange.
Sweet and savory: Use maple syrup or honey instead of brown sugar, add star anise and cinnamon sticks. Include apple cider in wet brine.
Citrus explosion: Add grapefruit, lemon, and lime along with orange. Include orange zest in dry brine.
Spicy Cajun-style: Add cayenne pepper, paprika, and hot sauce to wet brine. Include Cajun seasoning blend in dry brine.
Asian-inspired: Use soy sauce in wet brine, add ginger slices and star anise. Include five-spice powder in dry brine.
The Crucial Drying Step
Regardless of brining method, proper drying before roasting makes the difference between soggy, pale skin and the crispy, golden exterior everyone wants. After wet brining and rinsing, pat turkey completely dry with paper towels. Place on a rack and refrigerate uncovered for at least four hours.
For dry-brined birds, the uncovered refrigeration during brining doubles as drying time—no additional steps needed. The skin should feel dry and slightly tacky when ready to roast.
Some cooks leave birds uncovered in the refrigerator for up to twenty-four hours after brining. This extended drying produces incredibly crispy skin but requires significant refrigerator space.
Roasting Brined Turkey
Brined turkeys cook slightly faster than unbrined ones due to increased moisture content conducting heat more efficiently. Reduce standard roasting times by approximately ten to fifteen percent. Always use a meat thermometer—breast should reach 160°F to 165°F, thighs 170°F to 175°F.
Start roasting at 425°F for thirty minutes to jump-start browning, then reduce to 325°F for the remaining cooking time. This two-temperature method creates golden skin while cooking through gently.
Tent with foil if the skin browns too quickly before the meat finishes cooking. Let the finished turkey rest for at least thirty minutes before carving—this allows juices to redistribute throughout the meat.
Common Brining Mistakes to Avoid
Using table salt instead of kosher salt: Table salt is much finer and denser, making it roughly twice as salty by volume. If substituting, use half the amount or weigh salt instead of measuring by volume.
Not dissolving salt completely: Undissolved salt creates uneven brining with overly salty spots. Stir wet brine thoroughly and distribute dry brine evenly.
Brining a pre-seasoned turkey: Many grocery store turkeys are “self-basting” or pre-injected with salt solutions. Brining these creates inedibly salty results. Check labels carefully—if it mentions “solution” or “enhanced,” don’t brine it.
Skipping the drying step: Wet skin doesn’t crisp properly. Always dry thoroughly before roasting, especially after wet brining.
Over-brining: More time doesn’t equal better results beyond a point. Follow recommended timeframes to avoid mushy texture and excessive saltiness.
Safety Considerations
Brining creates food safety considerations requiring attention. Wet-brined turkeys must stay below 40°F throughout the process. If your refrigerator can’t accommodate the container, you can brine in a cooler with ice packs, replacing ice as it melts to maintain temperature.
Never reuse brine—discard it after removing the turkey. It contains raw poultry juices that could harbor bacteria.
Dry-brined turkeys sitting uncovered in the refrigerator should be kept away from other foods to prevent cross-contamination. Place them on the bottom shelf so nothing drips onto them.
Your Path to Turkey Excellence
Start with whichever method suits your circumstances—wet if you need faster results or want maximum moisture, dry if you prefer simplified logistics and crispy skin. Follow the basic formula exactly your first time to understand how the technique works.
After succeeding with the foundation, experiment with aromatics and seasonings that appeal to your household. Maybe you prefer more herbs, different citrus, or spicier profiles. These creative variations make the recipe yours while maintaining the essential brining principles.
Welcome to Thanksgiving turkey that finally lives up to its centerpiece status—where proper preparation creates results worth the effort, and where understanding simple chemistry transforms ordinary poultry into something genuinely special. Your juicy, flavorful triumph awaits in the refrigerator and then the oven.