Slow Cooker BBQ Pulled Pork Sandwiches: Tender, Juicy & Easy to Make
There’s something magical about walking into your house after a long day and being greeted by the smoky-sweet aroma of slow cooker BBQ pulled pork sandwiches that’s been bubbling away for hours. This isn’t difficult restaurant cooking—it’s the kind of easy pulled pork dinner that makes you look like a culinary genius while requiring almost zero hands-on effort. Perfect for hectic weeknights, game day gatherings, or anytime you need to feed hungry people without breaking a sweat.
Why This Crockpot Pulled Pork Sandwiches Method Wins
Traditional smoking takes twelve hours of tending a fire and monitoring temperatures. Even oven-roasted versions demand several hours of attention. The slow cooker approach eliminates all that hassle while still delivering fork-tender, flavor-packed results. You season the meat, drop it in the pot, turn it on, and walk away. Eight hours later, you’ve got BBQ pulled pork recipe perfection without ever babysitting a grill or adjusting oven racks.
The low, moist heat of a slow cooker pork shoulder breaks down tough connective tissue gradually, transforming an economical cut into something luxuriously tender. Fat renders slowly, basting the meat from within while preventing dryness. The sealed environment traps moisture and concentrates flavors in ways that open cooking can’t match. You get restaurant-quality pulled pork for a fraction of the cost and effort.
Selecting Your Pork for Success
Pork shoulder—sometimes labeled pork butt or Boston butt despite being from the shoulder—provides the ideal combination of meat, fat, and connective tissue for pulled pork. Don’t substitute leaner cuts like loin, which dry out during extended cooking. You want marbling throughout and a decent fat cap on top.
Look for a roast weighing four to five pounds, which fits most slow cookers comfortably while feeding eight to ten people generously. Bone-in versions cost less and contribute richer flavor as the bone releases gelatin during cooking, though boneless works fine if that’s what’s available. Some grocery stores sell pork shoulder pre-cut into chunks—these work identically and often cook slightly faster.
Check the meat’s color—it should be pale pink with white fat, not grayish or yellowish. Smell it briefly; fresh pork smells neutral or slightly sweet, never sour or off. If buying days ahead, keep it refrigerated in its original packaging. For immediate cooking, unwrap it and pat completely dry with paper towels—surface moisture interferes with spice rub adhesion.
Building Flavor Through Dry Rub
The difference between acceptable pulled pork and extraordinary versions often comes down to the spice rub. Commercial rubs work fine, but making your own costs less while letting you control salt levels and customize heat. This formula balances sweet, savory, smoky, and spicy for well-rounded complexity.
Championship-style dry rub:
- Three tablespoons brown sugar (light or dark)
- Two tablespoons smoked paprika
- One tablespoon kosher salt
- One tablespoon black pepper
- One tablespoon chili powder
- One tablespoon garlic powder
- One tablespoon onion powder
- Two teaspoons cumin
- One teaspoon cayenne pepper (reduce for mild heat)
- Half teaspoon dried oregano
Mix all spices thoroughly in a small bowl. This makes roughly three-quarters cup—enough for one four to five-pound roast with leftovers for future batches. Store extra rub in an airtight container away from light and heat for up to six months.
Preparing and Cooking Your Roast
Pat your pork shoulder dry once more—this step really matters for spice adhesion. Apply the dry rub generously all over the meat, pressing it into the surface so it sticks. Use all of the rub, even if it seems excessive. During cooking, liquids will leach out and some seasoning washes away, so heavy application upfront ensures properly seasoned meat throughout.
For even deeper flavor, apply the rub twelve to twenty-four hours before cooking and refrigerate uncovered. This dry-brining period lets salt penetrate deeply while the exposed surface dries further. The next day, let the meat sit at room temperature for thirty minutes before cooking—this promotes more even cooking throughout.
The cooking process:
Place the seasoned roast directly into your slow cooker. Some recipes call for searing the meat first in a hot skillet to develop a crust, but honestly, the slow cooker environment makes this unnecessary—you won’t notice the difference in the finished product, and skipping it saves time and cleanup.
Pour one cup of liquid around (not over) the meat. Apple juice or cider works beautifully, enhancing the pork’s natural sweetness while adding subtle fruitiness. Beef or chicken broth provides savory depth. Even water functions fine if that’s all you’ve got. Avoid adding barbecue sauce now—sugars burn during extended cooking, creating bitter flavors. You’ll add sauce later.
Place a few halved onions around the roast if desired—they soften into sweet, caramelized deliciousness that enriches the final sauce. Add whole garlic cloves, bay leaves, or a splash of liquid smoke for additional complexity, though these remain optional.
Cover your slow cooker and set it to low. Cook for eight to ten hours until the meat reaches an internal temperature of 200°F to 205°F—this high temperature fully breaks down collagen into gelatin, creating that signature pull-apart texture. The meat should literally fall apart when prodded with a fork. If cooking on high heat, reduce time to five to six hours, though low and slow produces superior tenderness.
Resist opening the lid repeatedly to check progress—every peek releases heat and adds cooking time. Trust the process and let the slow cooker work its magic undisturbed.
Shredding and Saucing for Perfection
When your timer signals completion, transfer the roast to a large cutting board. It might want to fall apart during transfer—that’s actually perfect. Let it rest for ten minutes, which makes handling easier and allows juices to redistribute.
Use two forks to pull the meat apart into shreds, working with the grain’s natural direction. Discard any large fat chunks or gristle, though small bits of rendered fat add moisture and flavor. If you find a bone, it should slip out effortlessly—save it for adding to bean soup or stock.
Meanwhile, examine the liquid remaining in your slow cooker. Often it’s fatty and needs skimming. Pour it into a fat separator if you own one, or refrigerate it briefly so fat solidifies on top for easy removal. The defatted cooking liquid is liquid gold—concentrated pork essence perfect for mixing back into the meat or enriching your barbecue sauce.
Return shredded meat to the slow cooker. Add your favorite barbecue sauce—start with one to one and a half cups, mixing thoroughly. Taste and add more sauce if needed, plus some of that reserved cooking liquid if the mixture seems dry. Many people prefer a mix of sauce and natural juices rather than meat swimming in pure sauce. Let everything mingle on warm setting for at least fifteen minutes so flavors marry.
Homemade vs. Bottled BBQ Sauce
Store-bought sauce certainly works, and honestly, most people use it for convenience. Choose varieties that match your regional preferences—Kansas City style runs thick and sweet, Carolina versions lean tangy and vinegar-forward, Memphis sauce sits in the middle with tomato-based balance.
If you want to make your own, this quick version rivals anything bottled:
Simple homemade BBQ sauce:
- One and a half cups ketchup
- Half cup apple cider vinegar
- Half cup brown sugar
- Quarter cup molasses
- Two tablespoons Worcestershire sauce
- One tablespoon Dijon mustard
- One tablespoon smoked paprika
- Two teaspoons garlic powder
- One teaspoon onion powder
- Half teaspoon cayenne pepper
Whisk everything together in a saucepan and simmer gently for fifteen minutes, stirring occasionally. The sauce thickens slightly and flavors meld. Cool before using or store refrigerated for two weeks. This yields approximately two and a half cups.
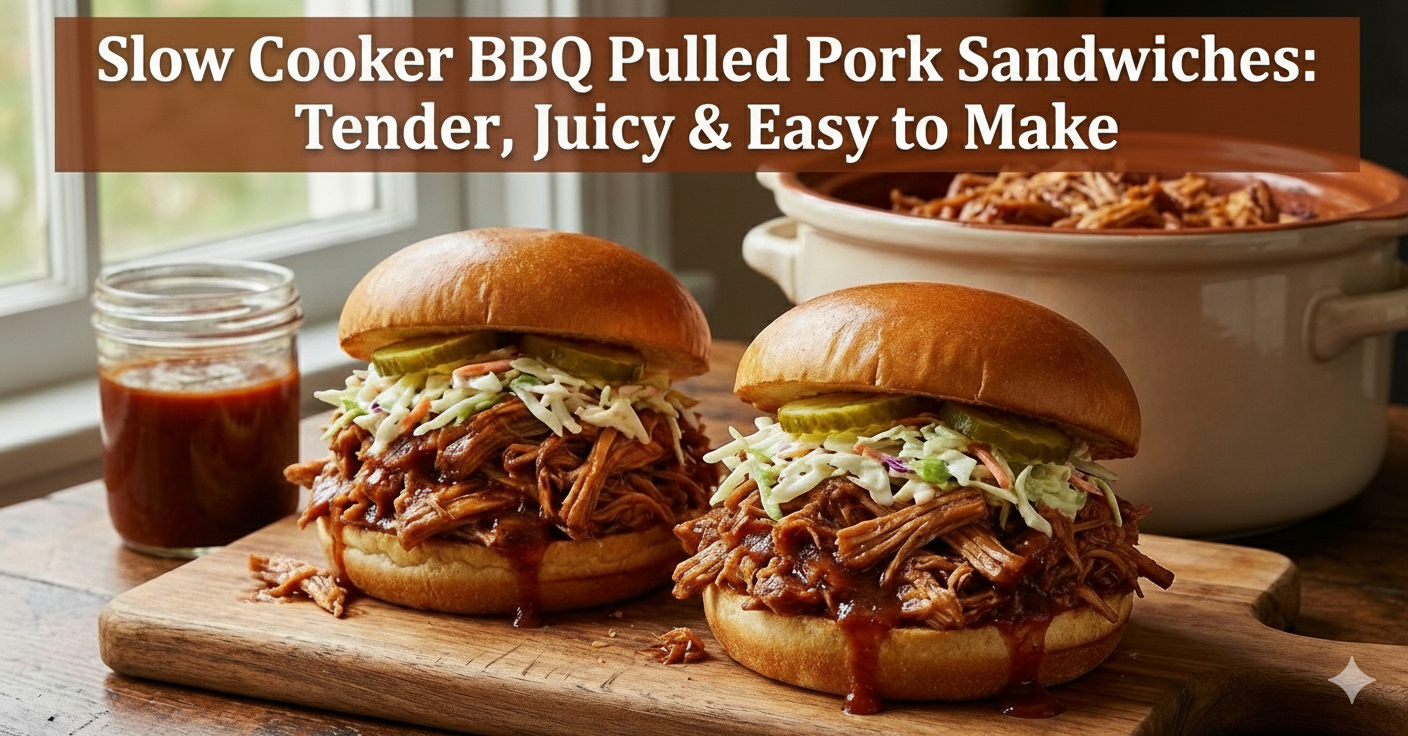
Building the Ultimate Sandwich
Great homemade BBQ pork deserves equally thoughtful sandwich construction. Soft hamburger buns provide classic comfort—toast them lightly to prevent sogginess from the saucy meat. Brioche buns offer buttery richness. Pretzel buns bring interesting texture and flavor. Kaiser rolls provide sturdiness for extra-saucy applications.
Pile generous portions of pulled pork on the bottom bun. Top with coleslaw for textural contrast and cooling crunch—the acidity cuts through rich pork beautifully. Some prefer slaw on the side, others insist it belongs on the sandwich. Both camps are right.
Add pickles, sliced jalapeños, or pickled red onions for tangy brightness. Drizzle extra sauce over the top if you’re a sauce enthusiast. Crown it with the top bun and press down gently to compress everything slightly. Serve immediately while everything’s warm and the bun hasn’t yet surrendered to sauce.
Scaling for Crowds
This pulled pork for a crowd method shines at gatherings since you’re already cooking for hours—scaling up costs almost no additional effort. Most six-quart slow cookers accommodate seven to eight pounds of pork, which feeds fifteen to twenty people generously when served as sandwiches.
For truly large gatherings, use multiple slow cookers running simultaneously. Prepare the meat identically in each, or try different regional sauce styles so guests can sample varieties. This self-service approach frees you from constant cooking, letting you actually enjoy your own party.
Calculate roughly one-third pound of cooked pulled pork per sandwich. A five-pound raw roast loses about thirty percent of its weight during cooking, yielding roughly three and a half pounds of pulled meat—enough for ten to twelve sandwiches. Plan accordingly based on your guest list and their appetites.
Perfect Side Dish Pairings
These shredded pork sandwiches pair naturally with classic barbecue sides. Creamy coleslaw provides cool contrast to warm, spiced meat. Baked beans echo barbecue flavors while adding substance. Potato salad offers creamy comfort. Corn on the cob brings sweetness. French fries satisfy everyone universally.
For lighter accompaniments, a simple green salad with vinaigrette balances the meal’s richness. Grilled vegetables add color and nutrition. Watermelon slices provide refreshing palate cleansers. Mac and cheese leans indulgent if you’re going full comfort food route.
Don’t forget pickles, hot sauce, and extra napkins—pulled pork sandwiches get wonderfully messy, which is part of their charm.
Leftovers That Keep On Giving
Refrigerated pulled pork maintains quality for four to five days in airtight containers, making this ideal for family-friendly slow cooker meals that stretch across multiple dinners. Reheat portions gently in the microwave or on the stovetop with a splash of water to prevent drying.
Freeze individual portions in freezer bags or containers for up to three months. Thaw overnight in the refrigerator, then reheat. The texture remains remarkably similar to fresh, making this excellent for meal prep marathons.
Beyond sandwiches, leftover pulled pork transforms into countless dishes. Top baked potatoes or nachos. Fill quesadillas or tacos. Mix into mac and cheese. Layer into breakfast hash with eggs. Toss with pasta and vegetables. Add to pizza or flatbreads. The options multiply endlessly once you’ve got pulled pork on hand.
Game Day Glory
Few dishes suit game day pulled pork scenarios better than this. Prepare the meat the night before, refrigerate it, then reheat gently in the slow cooker on warm during the game. This approach actually improves flavor as the sauce penetrates deeper overnight. Set out buns and toppings, letting guests build sandwiches at their leisure while you focus on enjoying the event.
Create a pulled pork bar with multiple sauce options, various toppings, and different bun styles. Include coleslaw variations—traditional creamy, vinegar-based, or spicy Asian-style. Offer different pickles, hot sauces, and cheese options. This interactive approach entertains guests while accommodating different preferences.
Troubleshooting Common Issues
Dry pulled pork usually results from overcooking or choosing too-lean cuts. Pork shoulder has enough fat to resist drying, but leaving it on high heat for twelve hours will do it. Stick to recommended times and temperatures. If your finished pork seems dry, mix in more cooking liquid or sauce—this often rescues the situation.
Tough meat that won’t shred indicates insufficient cooking time. Return it to the slow cooker for another hour or two. The meat isn’t truly done until it falls apart effortlessly. Don’t rush this—patience rewards you with perfect texture.
Bland flavor suggests inadequate seasoning or using only water for cooking liquid. Season aggressively with the dry rub and consider apple juice or broth instead of plain water. Taste your finished product and adjust with additional salt, pepper, or sauce as needed.
Regional Variations Worth Trying
Different barbecue regions approach pulled pork distinctly, each delicious in its own right. Carolina versions feature vinegar-heavy sauces—mix cider vinegar, ketchup, brown sugar, and hot sauce for tangy-sweet perfection. Memphis-style uses dry rub prominently with sauce served on the side rather than mixed in. Texas influences mean less sweet sauce with more heat and smoke flavor.
Experiment with these regional approaches once comfortable with the basic technique. Your slow cooker doesn’t care which style you’re attempting—it produces tender meat regardless. The fun comes from exploring how different seasonings and sauces transform the same base protein into distinctly different eating experiences.
Why This Comfort Food Sandwiches Method Works
The science behind slow cooker success explains consistent results. Low temperatures (around 200°F internally) gradually denature proteins without squeezing out moisture the way high heat does. Connective tissue’s collagen melts into gelatin, creating lusciousness impossible in lean cuts. The sealed, moist environment prevents evaporation that concentrates meat and toughens it.
Time itself becomes a cooking tool. Hours of gentle heat accomplish what aggressive temperature can’t—thorough breakdown of tough fibers while maintaining juiciness. This transforms an economical, challenging cut into something special without requiring skill or constant attention.
Your Path to Pulled Pork Mastery
Start with the basic recipe exactly as written, using a good dry rub and your favorite bottled sauce. Notice how simple the process actually is—mostly waiting rather than working. Observe the meat’s transformation from firm roast to fall-apart tender strands. Taste how the seasonings penetrate throughout and flavors develop.
Once you’ve nailed the technique, experiment with different spice blends, sauce styles, and cooking liquids. Try beer instead of apple juice. Use different regional sauces. Adjust heat levels. These variations teach you how different elements affect the final product while building confidence.
Keep notes on what worked brilliantly and what you’d change. Did your household prefer more or less sauce? Should you increase garlic powder next time? Would they like coleslaw mixed in or served separately? These observations personalize the recipe, making it truly yours.
Welcome to cooking that fits seamlessly into real life—minimal active work producing maximum satisfaction. These slow cooker BBQ pulled pork sandwiches prove that spectacular meals don’t require complicated techniques or constant attention, just quality ingredients treated with patience and respect. Your new go-to crowd-pleaser awaits.